Posted on

Truing vs. Zeroing Your Rifle: Understanding the Differences
When it comes to precision shooting, two essential processes come into play: truing and zeroing your rifle. Both are crucial for accuracy, but they serve different purposes and involve distinct methods and gear to accomplish. Understanding the differences between these two processes can significantly enhance your shooting performance.

What is Zeroing?

Zeroing your rifle is the process of aligning your sights or scope with the point of impact of your bullets at a specific distance. This is typically the first step you take after mounting a scope. Here’s how it works:

1. Choose a Zero Distance: Commonly, shooters zero their rifles at 100 yards or meters, but this can vary based on your specific needs and shooting discipline.

2. Adjust Your Scope: Using a target at your chosen distance, you adjust the windage (left/right) and elevation (up/down) turrets on your scope until your point of aim matches the point of impact.

3. Confirm Zero: After initial adjustments, shoot a group of 2-4 shots to confirm that your bullets consistently hit the target at your zero distance.

What is Truing?

Truing is a more advanced process that involves fine-tuning your rifle’s ballistic data to match real-world performance. This ensures that your ballistic calculations are accurate at various distances. It is important to keep in mind that muzzle velocity and ballistic coefficient can vary from what manufacturers state on ammunition boxes. Truing typically involves:

1. Collect Data: Shoot at extended ranges and collect data on bullet drop and drift. The Horus Ballistics App provides range recommendations for collecting muzzle velocity and ballistic coefficient data. Your muzzle velocity data should be around a transonic velocity and your ballistic coefficient should be subsonic.

2. Update Muzzle Velocity: Sometimes, the measured muzzle velocity might need slight adjustments to align with observed impacts.

3. Adjust Ballistic Coefficients (BC): Modify the ballistic coefficients in your ballistic calculator to match the actual flight of your bullets. The Horus Ballistics App allows for simple and easy manual adjustments once your data has been validated. For more information on truing in the Horus Ballistics App, be sure to check out this video.

Key Differences

– Purpose: Zeroing aligns your point of aim with the point of impact at a specific distance, while truing adjusts your ballistic data for accuracy over a range of distances.

– Complexity: Zeroing is straightforward and usually the first step in setting up your rifle. Truing requires more detailed measurements and adjustments based on observed performance.

– Tools Needed: Zeroing primarily involves your rifle, scope, and a target at a fixed distance. Truing requires a ballistic calculator and a laser range finder for measuring and shooting at extended ranges. The HoVR™ Laser Rangefinder connects via Bluetooth to the Horus Ballistics App to automatically populate your range data. 

When to Use Each Process

– Zeroing: Always perform zeroing first. It’s essential whenever you mount a new scope, adjust a scope, change ammunition, or notice significant shifts in point of impact.

– Truing: Use truing when you want to ensure your ballistic calculator’s predictions match real-world performance, especially for long-range shooting in different environments.

Conclusion

Both zeroing and truing are vital for precision shooting, but they serve different roles. Zeroing sets the foundation by aligning your sights with your target at a specific distance, while truing fine-tunes your ballistic data for accuracy over varying distances. By mastering both processes, you can significantly improve your shooting precision and confidence in hitting your targets at any range.

Posted on

Hear it From Hodnett: Preparing for the Shot

Preparing to take the Shot 

Hunting in a new country and in unfamiliar territory always brings its own set of unique challenges. Being prepared to adapt and overcome those challenges is what will allow you to find success on your hunt. 


There’s no one better than Todd Hodnett to take on these challenges and be prepared for whatever gets thrown his way. Our last blog covered what gear he packed, now follow along as Todd arrives in New Zealand to try his hand at a Tahr hunt. 


Traveling across the world with gear that has been carefully selected for this trip is only part of the process when it comes to preparing for a hunt. Understanding the unique dynamics of new terrain, new weather, new atmospheric conditions and a new species means that the success will come from the preparation.

Alternate range zero in New Zealand


“The trip started out with normal shooting classes covering things we thought would be helpful on this type of trip. Then, we moved to the range to get a quick zero and would move on to high angle fire for the afternoon.”


Zeroing

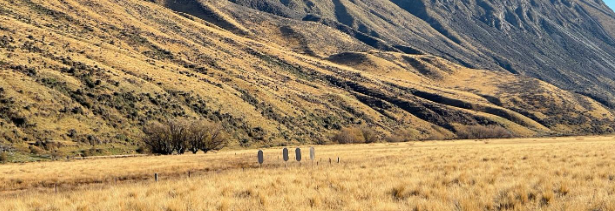
“As it happens occasionally, the area was not perfect for 100m paper targets. If you missed the paper with a non zeroed scope, the bullet would not be traceable because of the tall grass that went on for several hundred meters beyond the paper.  So, Colby and I quickly taught an alternate range zero class. This allows one to pick a target at a distance where a splash can be seen. There are rules that should be adhered to in doing this process. For example, you don’t want to do this at such a far distance if the muzzle velocity of the weapon is unknown. If the muzzle velocity, ballistic coefficient and density altitude are known, this can be done at distance. 


In this case, we had a large boulder at 371 meters, which allowed us to hold what our ballistics engine gave us for that distance and then shoot to see where the bullet hit. At this point, we would dial until we hit with the hold or until we hit with the crosshairs. Either method will work. If you use the hold method, you would then need to dial down what the hold was supposed to be when you confirm at 100 meters and use crosshairs. Then, you would need to slip your turrets once you refine your zero. Or, the way I like to do it, is just use a hold and dial until my bullet is hitting the alternate range target with the appropriate hold for that distance. Then, slip my turret to zero after I confirm at 100 meters.

Where we were shooting, we had rocks uphill from our location and it’s perfectly fine to true your muzzle velocity if you plug the inclination angle into the ballistic engine.”


What’s the big deal about high angles?

“Once we were trued, we started the high angle class. I have taught high angle for 20 years and am always amazed that people are shocked when they see how easy it is. I always think back to a friend that was the lead instructor in Switzerland at the high angle range and he asked me while we were on the mountain, what’s the big deal about high angles? I stated I have no idea as it’s very deterministic. You just plug in the angle and shoot the corrected dope or use my quick angle formula to do the correction in your head. He laughed and said “we miss because of winds, not angle.” I laughed with him and said “right”. High angle is easy, but most people only ever see angle of fire, not high angle. If you’re shooting 30 degrees at 500 meters with a traditional .308, it’s not high angle and the quick math is only .75 off flat dope. However, even steeper shots at more distance are easy with a ballistic engine. I like to use the Theodolite app for angle resolution. One can use angle cosine indicators that attach to your gun or use my hand thumb method for 15 degrees. There are lots of tools that work just fine, including Binos or laser rangefinders that give angle. You just never want to use slope distance. Rifleman’s rule and the improved rifleman rule has tons of errors if you’re shooting at any distance. If you’re shooting close range, they work fine, just do the math prior and see where they quit working. 


Angle of fire most of the time will demand positional shooting. Good tripods are an excellent complement to your kit. It’s rare that we ever can shoot in the prone while shooting angle. But this style of shooting is easy, just get as many points of contact as possible to stabilize your weapon and most of all, have good recoil management where you can see your impact. If you miss for wind, you can correct your shot or even when you hit the target, the animal may be in a crowd or run into one and you may have to track it for a follow up shot. Spend time with a good tripod on a flat range and even dry fire in your house to get a good feel for different techniques that work well and then take it outside and work the up and down angles to familiarize yourself.” 


Stay tuned for Hear it From Hodnett Series 3!